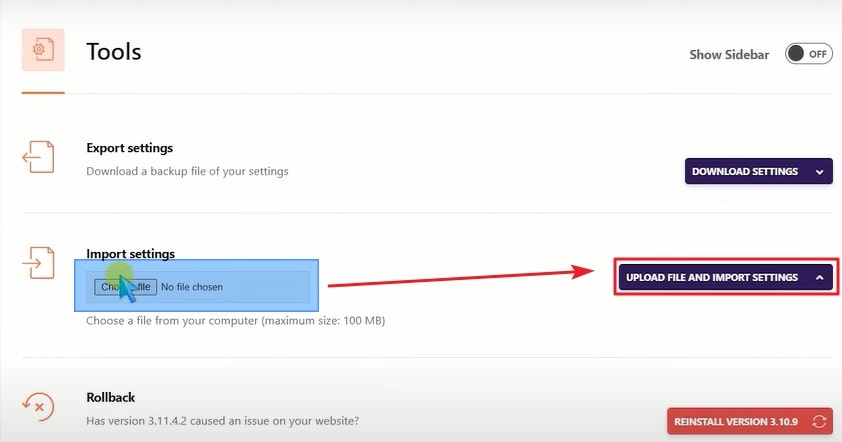
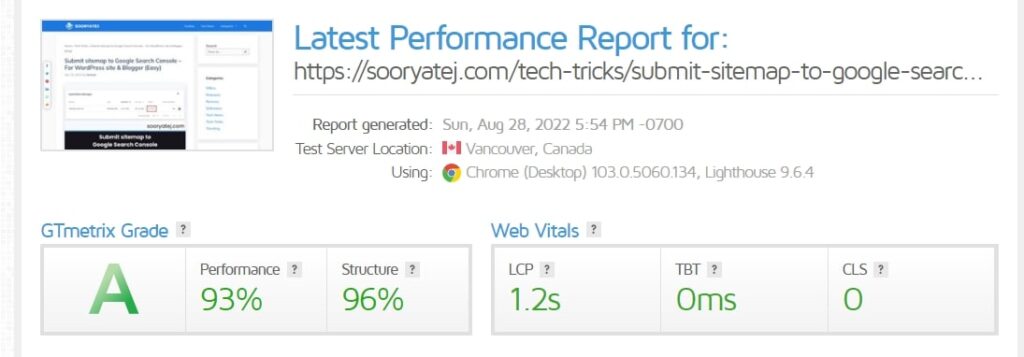
Download and install the WP Rocket plugin. Go to Settings > WP Rocket > Tools > Upload & Import Settings. Download and Upload the settings JSON file in WP Rocket. Clear Cache and Refresh your website. Check the speed on Page Speed Insights and GTMetrix Speed Test. You will be amazed by the results.
Want to learn more? Continue Reading
Do you want to boost the speed of your website to rank on Google? Well, most WordPress themes have decent speed. But the speed will be less if your website has ads for Google Adsense or Ezoic.
Today, we are going to see about fixing this issue. Even though your website doesn’t have ads, this method works. Using this method, I achieved a score of 100/100 in Google Page Speed Insights for mobile view on shared hosting and with ads.
Let’s start implementing this WP Rocket trick.
Speed up your Website using WP Rocket
We are going to use WP Rocket’s import tool to import a JSON file that has configuration settings. So, here is a rough outline for this trick.
The steps to speed up your website using WP Rocket are as follows:
- Download and Install WP Rocket Plugin
- Download the settings.json file
- Go to Settings >
WP Rocket> Tools > Upload & Import Settings. - Upload the settings JSON file.
- Clear Cache and Refresh your website.
- Use
OMGFplugin to optimize your fonts - Check the speed on Page Speed Insights and GTMetrix Speed Test.
Let’s implement these steps in your WordPress site.
1. Install the WP Rocket plugin
WP Rocket is a caching plugin. It also optimizes some of the most important factors that slow down a website like Core Web Vitals, First Contentful Paint, Speed Index, etc. It is a paid plugin.
WP Rocket is ranked as the best speed plugin by Hubspot. Many websites use WP Rocket. As there are many websites using this plugin, many developers are also experimenting with its settings and code to optimize WordPress.
In this trick, we will use one of such settings to get a Page Speed Insights score of 100/100. So, this plugin is mandatory. WP Rocket has the following features for you:
- Easy & Quick Setup
- Faster loading speeds
- Website Speed Optimization
- Works well with all eCommerce plugins
- Compatible with all hosting providers
- Good Customer Care service
- Multi-lingual support
- Trust Pilot 4.9 out of 5 Rating
To be honest, I use WP Rocket on my websites. You can check my speed on Page Speed Insights, it will always be more than 95 both on mobile and desktop. Even, my website has Adsense ads so a speed/caching plugin is a must.
WP Rocket is the perfect fit for blogging and e-commerce. So, I recommend WP Rocket to all bloggers and eCommerce store owners who use WordPress.
Secret Trick: If you can’t afford to buy WP Rocket for many sites, you can buy it for a single site from retailers. A WP Rocket plugin from a retailer can cost you from $3 to $10. So, you can get the cheapest WP Rocket from Theme9.net from the link below (Coupon Included).
Okay, now that you have installed the WP Rocket plugin, it’s time to implement this trick.
2. Uploading the settings JSON file
In this step, we are going to upload a JSON file to WP Rocket. This file has all the optimal settings to maximize the speed of your website. You can download this settings.json file from below.
You will get a ZIP file, you have to extract it to get the settings.json file.
Now that we have the settings file, we have to upload it to WP Rocket to set the optimal settings.
3. Upload the JSON file and Import settings
To upload the JSON file to WP Rocket, go to Settings > WP Rocket > Tools > Import Settings from the left menu of WordPress and WP Rocket.
Click Choose the file and select the given file. After this, click on Upload File And Import Settings (See the image below). Learn More about importing and troubleshooting in WP Rocket.

After these steps, clear the cache by going to WP Rocket > Clear Cache from the top menu in WordPress.
If you have done all these steps correctly, then you are good to go for the speed test.
But if you are using any fonts from Google Fonts or any other provider, you need to optimize them too. If you are using a system font, you are not required to optimize fonts.
Now, let’s see how to optimize fonts using OMGF Plugin.
4. Optimizing fonts with OMGF
OMGF is a free plugin that offloads all the requests of Google Fonts to cache. We are going to use this to optimize the fonts on our website.
To install the OMGF plugin, go to Plugins > Add New > Search OMGF > Install > Activate. After installing and activating, it should look like this.

Activate is button turned to Active and is also greyed out. We can proceed to our next step.
Now, go to Settings > Optimize Google Fonts > Save & Optimize. Its default settings are good. So, after going to Optimize Google Fonts tab, just scroll down and save the settings.

Note: Whenever you change the font of your website, you have to clean the cache of OMGF and WP Rocket.
Finally, this optimization process is completed. Now, let’s check the speed of our website.
Speed Test on Page Speed Insights, GTMetrix, Pingdom tool
Note: I am considering only Mobile Speed because Google gives more priority to mobile speed and also most of the themes have good speed on computers but not on mobiles.
Page Speed Insights speed test

Check your website speed on Page Speed Insights.
GTMetrix speed test

Check your website speed on GTMetrix.
Pingdom Tool speed test

Check your website speed on Pingdom Tool.
Trust me, your site speed will increase after you have done these easy steps.
Note: Always check the speed of single post of your website besides homepage, categories, tags, search queries pages.
Now, let’s take a look at some of the Frequently Asked Questions (FAQs)
Frequently Asked Questions (FAQs)
How to get a score of 100/100 in mobile view in Page Speed Insights?
To get a score of 100/100 in mobile view in Page Speed Insights, install and set up WP Rocket Plugin. Download my custom settings.json file. Upload it to WP Rocket. Clear Cache and check the score.
Is WP Rocket a paid plugin?
Yes, WP Rocket is a paid plugin. You can buy for $249 per year for infinite sites. But you can get it for less than $5 from retailers like Theme9.net.
How to get WP Rocket for less than $5?
You can get WP Rocket for less than $5 per WordPress site from retailers like Theme9.net. Its current price is $4.5. Within 24 hours of purchase, the WP Rocket plugin will be activated. Learn More (Coupon Incl.).
What is WP Rocket?
WP Rocket is a caching plugin that improves some of the most important factors for the speed of WordPress sites like Core Web Vitals, First Contentful Paint, Speed Index, etc. It is a paid plugin.
Does speed impact SEO?
Yes, your website’s page speed impacts SEO. Search Engines like Google prefer a faster website over a slower one, if the content is similar. Google also checks various factors like layout, font size, responsiveness of your website. Also make sure that your website loads fast on mobiles also.
At the end
This is how you can optimize your website by improving speed. If you have any other queries, you can comment below.
Even though I have Google Adsense ads, this trick works for me. And even for the WordPress sites on shared hosting like Hostinger. So, definitely try it out!
If this trick worked out for you, share this article with other WordPress website owners.
Thank you.

